The Inbox works as a To-Do list for most of us. Having too many emails in the Inbox can be overwhelming and distracting. You can use QuickFile PRO's Defer function to make Outlook only show emails when you actually need them.
I can show you how this works with my morning email routine. I don't want emails to take over my day so I have scheduled 10.30 am as my email processing time. BUT some emails need my immediate attention... as soon as I get into the office.
Here's what I do...
I download my emails when I get into the office. I then step through the emails one by one.
If an email needs urgent attention (sales emails), I respond. If it is something that someone else in my team can respond to, I forward it on.
Otherwise I click the Defer button (which QuickFile PRO adds to Outlook) and defer the email to 10.30 am.
The deferred emails are moved out of my Inbox... so they no longer distract me.
At my preset time of 10.30 am, my deferred emails reappear in my Inbox and I go through them in more detail.
This process (and the Defer button) ensures that urgent matters get attended to... without letting emails completely take over my morning.
How to use the Defer Button
The Defer button is added inside Outlook for you if you install QuickFile PRO for Outlook.
1. Select the email that you want to Defer.
2. Click the Defer button on the QuickFile toolbar (which is displayed inside Outlook)
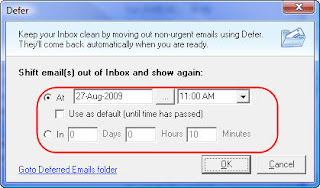
3. Use the screen to enter when you want to see the email again. You can either enter an exact time (e.g. 10 am) or you can choose to look at the email after a set duration (after 30 minutes)
4. Click OK.
The email will be moved out of your Inbox (and will reappear at your set time).
Looking at Deferred Emails (before they come back to the Inbox)
If you need to look at a deferred email before it comes back to the Inbox (maybe you finished your other work or a meeting got changed):
Click the Defer button on the toolbar.
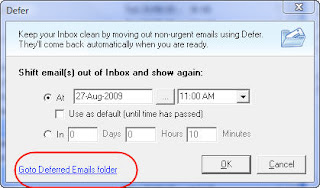
Click the Goto Deferred Emails folder link.
The Defer function has proven to be useful to many QuickFile users. Try it out today.
If you're not a QuickFile user, you can learn more about QuickFile PRO for Outlook here.