On February 24th 2009, Microsoft released an update for Microsoft Outlook 2007. General reports indicate that this update is solving a lot of problems for users experiencing instability and speed issues with Outlook 2007.
But… this update is NOT carried out automatically if you are using Windows Updates and it is even not available for download. Instead you need to request the download from Microsoft using a form on their website.
Although I have not tested the update myself (my Outlook has been behaving very well recently), here are the most important links that I could find on this topic.
Microsoft Articles
Request and Download Outlook Update: Use links on this page to request Microsoft for the download link.
Whitepaper: Additional information for Network Administrators.
Articles on the Microsoft Outlook Team Blog
February Cumulative Update Announcement: Initial announcement
Frequently Asked Questions: Top questions, comments and concerns regarding the update
WARNING: Make sure you don't need to use Outlook immediately after installing the update. Your Outlook data files will be converted the first time you open Outlook. This may take a few hours if you have a lot of data.
Did the update work for you?
If you download and install the update, please let us know of its effects by leaving a comment on the blog.
Wednesday, March 25, 2009
Essential(?) Update for Outlook


Wednesday, March 11, 2009
Marking Outlook Appointments as Complete
A reader asked me if there was anyway in Outlook to mark appointments as complete... this is available for Tasks so it should be fairly safe to assume that there must be an easy way to do the same for appointments/calendar items. It turns out there is no built-in way to do this but here's a work-around you can use instead.

If you are using Outlook 2007 (scroll down for earlier versions of Outlook)....
The color of appointment items in Outlook 2007 is controlled using categories.
First... let's create a category to mean Complete.
Go to your Calendar.
Right-Click over any existing appointment.
Click Categorize and then click All Categories.
Click the New button.
Enter a name for the category (I used the word Complete), choose a Color and click OK.
Click OK again to return to the Calendar screen.
The appointment you had right-clicked over should now be colored. If this appointment is actually not completed, you can clear the color by...
Right-click over the calendar item.
Click Categorize and click on the Complete category again (or click on Clear All Categories).
To mark another appointment on your calendar as complete.
Right-click over the calendar item.
Click Category and select the category of your choice (the Complete category).
If you are using Outlook 2003 or earlier....
The color of appointment items in Outlook 2003 (or earlier) is controlled with labels. Outlook comes with a default set of 10 labels (each of a different color) and you can also create your own.
First... let's change one of the labels to mean Complete.
Go to the Calendar folder.
On the menu at the top, click Edit-Label
Edit the label text as needed (I have changed my Red label to Complete)
Now... to mark an appointment on your calendar as complete..
Right-click over the calendar item.
Click Label and select the label of your choice.
Easy!
This little technique makes it simple to see which appointments have been completed and which ones still need your attention. You can also use the same technique to color code different types of appointments for quick visual reference.
Did you like this article? Do you have suggestions to improve this technique?... Please leave a comment on the blog.
Related Articles
Color Coded Emails In Your Inbox
Let Outlook Highlight Important Emails
Wednesday, March 4, 2009
QUICK & EASY EMAIL SORTING
Do you have folders with huge lists of emails in them? Here is a quick easy way to find particular emails by sorting your emails anyway you want.
Go to your Inbox (or any other email folder that you wish to sort). Do you see a list of column titles at the top (with labels like From, Subject, Received)

To sort by the Received date, click on the Received column title (as shown above).
You will notice a little arrow next to the Received column title in the screen above. This indicates that the email list is sorted by the Received column.
The arrow pointing downward means that the list is sort in descending order i.e. the newest emails are at the top of the list and the oldest are at the bottom (for other fields it means that it will sort from Z to A).
The arrow pointing upward means that the list is sort in ascending order i.e. the oldest emails are at the top of the list and the newest are at the bottom (for other fields it means that it will sort from A to Z).
To make a list sort by a different column, simply click on the title of the column you wish to sort by.
To change the way a list is sorted (i.e. change from ascending to descending), click on the title of the column again.
In summary… to sort, click on the column title!
If you find this post useful, please leave a comment on the blog.
Other Articles of Interest:
Tuesday, February 24, 2009
Speed Reading with the Outlook Reading Pane
 Here's how to turn on Single key reading using space bar.
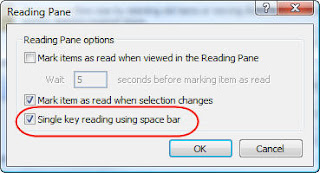
Now when you are reading emails in Outlook via the Reading Pane, clicking the Space Bar will shift you from one email to the next.
See More of Your Email when using the Reading Pane
Wednesday, November 5, 2008
Outlook Email Notifications for Important Emails Only!
Most Outlooks users turn off Outlook’s email notification message. With the volume of emails we all receive these days, it is way too detrimental to productivity to have a message interrupt you every time you receive an email. But… what if you want to be alerted whenever you receive emails from particular people… maybe your boss… or an important client.
Did you know that you can use Rules to display an alert similar to the one shown below... so that it will only come up when you receive an email from one or more specific email addresses?
Here are step by step instructions…
Go to your Inbox.
Click Tools-Rules and Alerts to display the Rules dialog box.
Click the New Rule button to display the Rules Wizard screen.
Click “Display mail from someone in the New Item Alert Window”. (A on the picture above)
Click on “people or distribution” list (B on the picture above) to display the Rule Address screen.
Select someone from the list or type in the person’s email address in the From field.
Click OK to go back to the Rules Wizard screen.
Click “a specific message” (C on the picture above)
Type in what you want the alert message to say and click OK e.g. Email from Boss!
Click Finish
The next time you receive an email from that person, Outlook will display a message over everything else that you are working on.
This simple trick has helped our own team a lot. I hope it works well for you too.
If you find this tip useful or have your own tips for better email notifications, please leave a comment on the blog.
Monday, October 20, 2008
Email Horror Stories (CNN)
CNN today ran the story Experts reveal e-mail nightmares, safety tips. They have some funny (because they happened to someone else) horror stories of how emails sent to the wrong person have caused embarrassment and even big financial loss.
In a recent online survey conducted by AOL, 32 percent of the 4,000 respondents have at one time or another mistakenly forwarded an e-mail to an unintended recipient. And often, it's something NOT so nice.
In the CNN article, Roger Matus, keeper of the blog Death By Email, has some good MANUAL TIPS to avoid this mistake including:
- Forget that the Reply-to-All button exists (or see our automated solution later)
- Type out the person's full name when addressing your e-mail. If you type just the first few letters and let your e-mail program fill out the rest based on your address book, it could easily misroute your message without you realizing it.
The manual methods will not work for most of us.
We have created an AUTOMATED SOLUTION that provides protection from this mistake and more. SendGuard for Outlook will:
1. Warn you whenever you click Reply-to-All (to avoid those accidental clicks)
2. Allow you to delay emails or emails to selected addresses by a preset time (so that you have some time to change your mind)
3. Get confirmation before Outlook sends out emails to all or selected email addresses.
4. Protect you from numerous other mistakes such as missing attachments, blank subject lines, incorrect subject lines, incorrect sending accounts and more.
Click here to get more information on SendGuard.
We also have a $10 discount on SendGuard until the end of Wednesday 22nd October as part of another update promotion.
Click here to purchase SendGuard at the discounted price before 22nd October. The page is for an UPGRADE OFFER we made to our customers so the text is not directly related to this post... simply scroll down to the ORDER link which has the $10 discount applied to it.
Wednesday, October 15, 2008
Better Email Subject Lines in Outlook
A few days ago I asked for comments on Misleading Email Subject Lines. Firstly let me say I am truly grateful for the large number of responses I received both on the blog and via email.
I have collated your questions, answers and suggestions below in Question and Answer format.
Q: How can you change the subject line of emails that you have received?
The answer to this took me by surprise as well. Simply open any email that you have sent or received, go to the subject line and type in whatever you want. I know that the Subject is read-only but it’s not. Close the email to save the changes.
You can use this technique to change the Subjects of emails that you have received so that the Subject line makes sense when you refer to it in the future.
Q:How can you change the subject line of emails that have already been sent?
Same as you do for emails you have received. Just open the email, go to the Subject Line (which looks read-only but really isn’t), type in your changes and close the email. Easy!
Q: How about email messages that are entirely in the Subject line – what does
You can write short emails that are entirely in the Subject line. The accepted practice if you do is to end the Subject with
Subject: Please call and confirm attendance to Q4 meeting
The reader than (maybe) knows that he doesn’t need to open the email.
Q: What do things such as RR:, AR, FYI, NH …
You may sometimes find that people add a few letters to the front of their Subject lines that don’t seem to make sense. For example:
Subject: RR: Can you confirm attendance to Q4 meeting
The more common ones and what they mean...
RR: Response Requested
AR: Action Required
FYI: For Your Information
NH: Need Help
It helps the recipient know why they are receiving the email. Technically speaking you should get rid of the RR, FYI etc when you reply to the email
ANNOUNCEMENT (regarding an upcoming announcement)
Within the next two days I am hoping to announce a simple solution to stop you from making mistakes such as ones discussed here (e.g. Misleading Subjects). I’ll let you know when I am ready.
Till then, please leave a comment on the blog.


