Wednesday, April 7, 2010
Outlook4Business Blog has moved + New Outlook Articles (on New Blog)
Wednesday, February 24, 2010
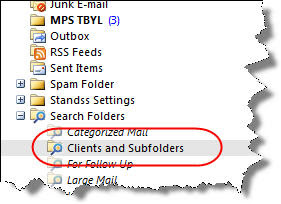
Showing the number of Unread Emails in an Outlook folder AND it’s subfolders
- Go to your Inbox.
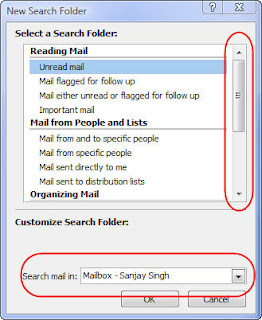
- Click File-New-Search Folder

- Scroll down the list and select Create a Custom Search Folder.
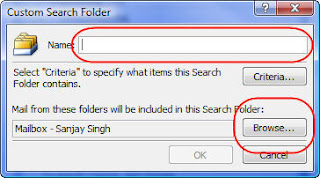
- Click Choose... to display the Custom Search Folder Screen.

- Enter a suitable name (e.g. All Client Folders)
- Click the Browse Button.
- Untick the main data folder from the top and just select the folder that you are interested in. Make sure that Search subfolders is ticked.
- Click Ok, click OK and click OK again to return to your Inbox.

Tuesday, December 8, 2009
Holiday Tips, Thank You & Children’s Project
Sending out Invites, Greetings & Newsletters via Email, Fax or Post
Monday, October 19, 2009
URGENT Email Virus Alert
A new setting file for the ***@*** mailbox has been released.
Or
Microsoft Outlook Notification for the ******.******@*****.be
If you received the above email or anything similar DO NOT CLICK ON THE LINK IN IT!
Turns out that the email contains a link to a file which is a Trojan that disables firewalls, steals sensitive financial data (credit card numbers, online banking login details), makes screen snapshots, downloads additional components, and provides a hacker with the remote access to the compromised system.
I did some quick research on this on the web and found the following links:
http://tinyurl.com/yk64mw3
http://tinyurl.com/yjupkfa
Short Solution… Check with your IT Administrator before downloading any file that claims to change your email settings!
Hope this post helps your computer stay safe.
Wednesday, August 26, 2009
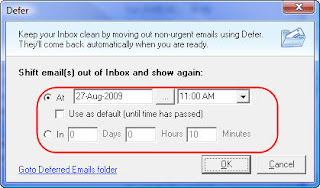
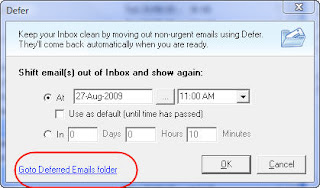
QuickFile for Outlook Tip: Viewing Inbox emails only when you need them


Printing Blank Calendars from Outlook
- Go to your Inbox.
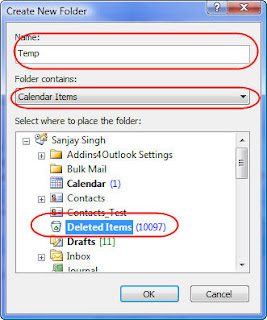
- Click File-New-Folder to display the New Folder Dialog

- Enter a suitable name (I used Temp)
- Change Folder Contains to Calendar Items
- Select a folder where you want the new Calendar to be created. (I selected the Deleted Items folder. I am only going to use this folder for printing i.e. I am not going to enter any real appointments in it)
- On the main menu click Go-Folder List.
- Select the Folder from where you created it (under Deleted Items for me)
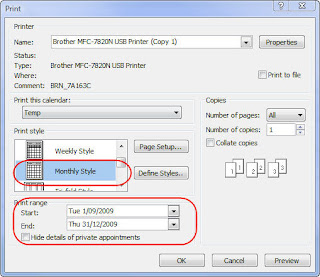
- Click File-Print

- Change the Print Style to Monthly
- Change the Date Range to the range you want to print.
- Click Preview
- Click Print
Wednesday, July 15, 2009
How to Write Emails that Get FASTER Responses to ALL your concerns/questions
Do you find that when you send out emails, people only send partial responses? Here is a easy tip that makes it easier for the respondent to address all your concerns AND gets them to address at least some of your issues faster AND also makes it easy for you to follow up.
The Secret… make one email about one topic/project only.
Why does it make it easier to get a response to all your questions?
Most people use their emails like a To-Do list. It feels great to knock a few things off that ever-growing list. So if you send an email with too many things in it, the respondent will reply and deal with either the most important or (more likely) the easiest questions. The email is then considered dealt with… they know you’ll email him again if you really need answers to the other questions.
Why does it get them to respond to at least some of your questions faster?
Other people will look at your email and think… It will take time to answer all those questions… I’ll respond later. They may procrastinate for a long time before getting back to you.
On the other hand, if you had separate emails for each topic… you probably would have received a response to things that could have been answered immediately. (We all want to knock things off that To-Do list)
Benefit for the person you are writing to: It gives them a much better way of managing To-Do items that relate to you.
Why is it easier to follow up?
If you have a separate email for each topic and use Outlook flags, Tasks or some other method of knowing what still needs to be followed up on… it’s easier to mark topics as completed as you get responses… and you know exactly what you still need to follow up on.
It’s also easier to resend an email that has not been responded to at all (than to forward and modify a partially responded-to email)
Try out this simple tip… you’ll find a big change in responses. I have.
Do you have your own ways of getting faster and complete responses? Tell me what you think by leaving a comment on the blog.
Before I forget… we have a great productivity booster announcement next week… if you’re not part of our email newsletter (which is different from the blog newsletter), sign up at www.standss.com
Wednesday, July 8, 2009
STOP Getting Spammed by Your Own Email Address
Over the last few weeks I have noticed that spammers have started more and more spam email from YOUR/MY email address. The email is from YOU and also to YOU. Chances are you have your email address white-listed . Here's a little trick I use to stop these emails from getting into my Inbox.
First why would you email yourself…last week I wrote a tip on how you can stay organized by emailing yourself… that could be a reason.
Here's how you can move the spam emails out of your Inbox but still keep the real emails you have emailed yourself.
Decide on a few characters that you will type in the Subject of every email that you send yourself. Keep it simple as you want to be able to type these characters from your BlackBerry etc as well. Use something like QAZ or whatever is easy for you to type.
Any time you send yourself an email type those characters in the Subject e.g. Instead of "Pick Stuff from Supermarket", you would need to type (say) "QAZ Pick Stuff From Supermarket".
Now setup Outlook.
1. Add your own email address to the Safe Senders list in Outlook (this is probably already done)
2. Create a Rule in Outlook so that all emails from your email address get moved to your Junk Mail folder, except those with your special tag in them (QAZ in the example above)
Click Tools - Rules and Alerts
Click New Rule to display the Rules Wizard
Click Move messages from someone to a folder.
Click people or distribution list. Enter all your own email addresses in the From field and click OK.
Click specified folder. Use the screen that comes up to select the Junk E-mail folder and click OK.
Click Next
Click Next
Tick except if the subject contains specific words.
Click Specific Words. Enter the tag (QAZ in example) and click Add. Click OK
Your Rules should look something like the following:
Click Finish.
Now anytime Outlook receives an email from you, it will get moved to the Junk Emails folder, EXCEPT when they have your special tag. EASY!
Does this tip work for you. Do you have other better methods. Tell me what you think by leaving a comment on the blog.
Related Links:
Fine-Tuning Spam Filtering in Outlook
Thursday, June 25, 2009
Outlook To Do Lists for the Disorganized: Use Emails instead of Tasks
Need to make sure that you get something done… EMAIL YOURSELF! This works much better for me then putting it on a Task List. Why? Like many people my Inbox acts as my real (or at least more immediate) Task List.
Here are some ways to get the most out of this super easy tip.
1. Basic Way: Just Email yourself when you need to remember to do something.
2. Need to follow up on an email that you are sending out to a client: BCC yourself on the email and a copy will end up in your Inbox.
3. From your BlackBerry or other email-enabled phone: This is my FAVOURITE. It means that I can update my To Do List from anywhere… I'm at the supermarket and remember that I need to call a client on Monday… easy… I create and send a email from my phone… and I can get back to chasing my 4 year old down the candy aisle.
Did you find this tip useful? Do you have your own creative ways of applying this tip. Leave a comment on the blog.
Other blog for this week:
Make sure the Subject of your email is right for the recipient
Wednesday, May 27, 2009
Use SendGuard for Outlook to avoid sending emails to the Wrong People
In my earlier post Why and how you may want to turn off Auto-Complete I wrote about how someone accidentally leaked confidential details to a New York Times reporter. If you deal with a lot of confidential information, here's another way you can make Outlook warn you when you send out emails.
SendGuard for Outlook will prompt you when you send out an email to anyone (or to selected recipients).
Assuming that you actually look at the message, instead of blindly clicking Yes, this simple prompt could save you a lot of embarrassment.
Do I use this feature myself? No.. The majority of the emails I send don't really have confidential information… I still use SendGuard for Reply and Reply/All warnings, missing attachment warnings, Subject Warnings and Clean-Up etc.
Your situation may be different if you send out a lot of confidential emails… still having the message come up for all emails may be a bit annoying.
In that case, you can also configure SendGuard to only prompt you on emails sent to particular people (for example your boss or your most important clients... or news reporters).
Go to your Inbox.
On the main menu, click Tools-Standss-SendGuard-Settings.
Select the Send Confirm tab.
Click Display message for only these email addresses.
Click Add and use the screen that comes up to add an email address. Repeat for as many addresses as you need to add .
Your criteria for choosing people to add to the list should be:
1. People whose emails must be worded correctly (e.g. important clients)
2. People to whom you don't want to accidentally send the wrong emails
Do you find this feature of SendGuard useful? Tell us what you think by leaving a comment.
Related Posts:
Why and how you may want to turn off Auto-Complete?
I like the Auto-Complete feature in Outlook. I like typing a few characters of an email address and then having Outlook give me a quick list to pick from based on the characters that I typed in. It saves me a lot of time… but it can also create problems too.
For example… a few days ago I needed to send an email to Anand Kumar… I was in a rush and accidentally picked and sent the email to Anand Singh instead… luckily for me the email did not contain any confidential information.
On the other hand, this lady wasn't so lucky...
The emailer higlighted in Lilly’s $1 Billion E-Mailstrom accidentally sent a confidential memo to a New York Times reporter (whose name was very similar to that of the intended recipient)… and they published a story on it.
http://www.portfolio.com/news-markets/top-5/2008/02/05/Eli-Lilly-E-Mail-to-New-York-Times
I have to admit… this lady had the absolute WORST luck… it's bad enough to send an email to the wrong person but what are the chances that the one email you mis-send has highly confidential information… and it ends up in the Inbox of a New York Times news reporter.
How to avoid this mistake… IF it is important enough to you.
I like Auto-Complete and I don't think the contents of most of my emails need me to take any drastic steps. However if you deal with a lot of confidential information then you may want to turn off Auto-Complete in Outlook.
On the Outlook menu, click Tools-Options.
Click the Email Options button.
Click the Advanced Email Options button.
Clear the tick next to Suggest names while completing To, CC, and BCC fields.
If you're really paranoid you may also want to clear the tick next to Automatic Name Checking.
Click OK. Click OK. Click OK.
Like I said earlier… my emails don't contain any highly confidential information and I'm happy to leave these settings on. Your situation may be different…
If you want an additional level of protection, you may also want to check out Use SendGuard for Outlook to avoid sending emails to the wrong people.
Do you have your own horror stories of mis-sent emails that you can share. Leave a comment on the blog.
Related Posts:
Outlook Auto-Complete Tips
Use SendGuard for Outlook to avoid sending emails to the Wrong People
Posted by
Sanjay Singh
at
5:14 PM
0
comments
Labels: Email, Outlook Tip, Productivity, SendGuard 4Outlook
Wednesday, May 13, 2009
QuickFile for Outlook Hidden Feature: Favourites
This tip is for you if you are one of the thousands of users of the latest version of our email filing tool (QuickFile for Outlook). QuickFile has a hidden feature called Favourites that users love… once they discover it.
What are QuickFile Favourites?
Whenever you need to file an email, QuickFile displays a list of recommended folders related to the sender/recipient of that particular email.
QuickFile can also display FAVOURITE folders on the same screen. Favourite folders are displayed for all emails irrespective of the sender or recipient of the email. I use Favourites for folders that I have created for Receipts, Jokes, Read later etc.
To add folders to Favourites in QuickFile.
1. Select any email in your Inbox and click the QuickFile button.
2. Right-Click over empty white space on the list as shown below and then click Add Shortcut.
3. Tick the folders you wish to add as favourites.
4. Select Favourites under “Who are the shortcuts for” as shown in the screen above and click OK.
Feedback from users regarding the Favourites feature has been very positive. Tell us what you think by leaving a comment on the blog.
Related Articles
Hidden Features in QuickFile
http://outlook4business.blogspot.com/2009/04/hidden-features-in-quickfile.html
QuickFile: How to file your emails without interrupting your work
http://outlook4business.blogspot.com/2009/04/quickfile-how-to-file-your-emails.html
Posted by
Sanjay Singh
at
7:51 PM
0
comments
Labels: Addins4Outlook, Email, Outlook Tip, Productivity, QuickFile
Windows Key Shortcuts you need to know about
Virtually all users have keyboard with the Windows Key on it… yet (from what I have seen), most users do not use it. Here are a few keyboard shortcuts using the Windows Key that will greatly speed up your work.
What is the Windows Key?
The windows key is a key on your keyboard that looks like:
How do I use the Windows Key?
The Windows Key can be used as a FASTER way to do many of the common tasks that you would normally use a mouse for. Here are my Favourites.
[Windows Key]: Display Start menu (same as clicking on Start button)
[Windows Key] + E: Opens up Windows Explorer. This is my favourite.
[Windows Key] + L: Locks you computer (very handy when you need to leave your computer for a few minutes)
[Windows Key] + F: Brings up the Windows Find/Search screen
[Windows Key] + D: Minimizes all windows and show the desktop
[Windows Key] + D: Restores all windows back to where they were
[Windows Key] + M: Minimizes all windows
[Windows Key] + [Shift] + M: Restores all windows
[Windows Key] + [Tab]: Cycles through your open programs (using the Vista Aero interface if you have it enabled)
[Windows Key] + R: Displays the Windows Run dialog
Do you have your own favourite Windows Shortcuts that other readers would be interested in. Please share by leaving a comment on the blog.
Related Articles
Essential(?) Keyboard Shortcuts for Outlook
http://outlook4business.blogspot.com/2008/10/essential-keyboard-shortcuts-for.html
More Outlook Keyboard Shortcuts
http://outlook4business.blogspot.com/2008/10/more-outlook-keyboard-shortcuts.html
Thursday, April 23, 2009
Hidden Features in QuickFile
We have literally had hundreds of emails from QuickFile users telling us how great they find the new release… and we’ve also had quite a few emails from users wanting new features added on.
Before we go any further… If you haven’t had a look at QuickFile yet, take a look at this video now. Even if you have tried QuickFile in the past, you owe it to yourself to at least see how the new version of QuickFile makes it possible to file your emails without stopping your work.
View QuickFile for Outlook Video
Back to the hidden features of QuickFile…
THE GOOD NEWS… MOST of the features requested by users are already in the current version. They’re just turned off by default… we wanted to keep the program as clean as possible for new users.
HERE’S A LIST OF SOME HIDDEN FEATURES
File Original with Reply: Chances are that when you reply to an email, you would like both the reply and the original filed in the same folder. When you reply to an email QuickFile can automatically file your original to the same folder as your reply.
Reply to an existing email and click Send so that QuickFile’s Send&File screen is displayed.
Click the Show Option hyperlink (bottom right corner of screen)
Tick the box labelled File original Received Email with Sent Email.
Click Send & File.
You can also have this box ticked by default using the Settings screen
Go to your Inbox and from the QuickFile toolbar, click More -> Settings (to display the Settings screen).
Create Tasks or Appointments from Emails: This feature is available in the trial and PRO versions of QuickFile. Extra buttons (Quick-Task and Quick-Appointment) have been added to your toolbar to allow this.
To display the buttons…
Go to your Inbox from the QuickFile toolbar and click More -> Settings (to display the Settings screen)
Click on the View tab.
Tick the boxes labelled Quick-Task and Quick-Appointment.
Click OK
Use the One-Click button to Copy (instead of move) and to go to a folder: The One-Click button has got a lot of praise from users. Here’s a few extra things you can do with it.
Click on the One Click button: Moves selected email to one-click folder
Press SHIFT and Click on the One Click button: Copies selected email to one-click folder
Press CTRL and Click on the One Click button: Opens up the one-click folder
Send&File the actual email (instead of filing a copy): We’ve setup QuickFile so that when you send and file, a copy of the email is filed and another copy remains in the Sent Items folder. This was a feature DEMANDED by many users… many users like to have a copy of all Sent emails in the Sent Items folder so they can quickly refer to it to fill in timesheets etc. BUT…
You can change the default so that your actual email gets filed out of the Sent Items folder.
Go to your Inbox and from the QuickFile toolbar, click More -> Settings (to display the Settings screen)
Select File/Move Original email to folder under When Using Send&File Button.
QuickFile has many more hidden features you can turn on and off. I hope this small list helps you get started.
Related Posts
QuickFile: How to file your emails without interrupting your work.
Posted by
Sanjay Singh
at
7:53 PM
0
comments
Labels: Addins4Outlook, Email, Outlook Tip, Productivity, QuickFile
Monday, April 13, 2009
Report #2 on Email Management System is ready (Reader Tips)
Thank you all for the fantastic response to our first report titled:
8 Simple Tips for E-Mail Management in Microsoft Outlook
Readers have been coming back to me with very positive feedback PLUS many of you have come back with YOUR IDEAS to IMPROVE the system.
I have collected the best of these ideas and created a BONUS report that you can download from:
http://www.standss.com/t/0904/report.asp
I also have two questions for those who have tried this system.
1. Does this system work for you?
2. If NOT, what are the one or two main reason you think this system fails to serve you.
I look forward to hearing from you.
Regards
Sanjay
PS: I really would like to hear from you if this system has failed you. Send me an email to news@addins4outlook.com and tell me... what are the one or two main reasons this system fails/works for you.
PSS: Don't forget to download the new report. It may contain the one piece of information that you need to get the system working for you.
http://www.standss.com/t/0904/report.asp
Monday, April 6, 2009
Special Report: 8 Simple Tips for E-Mail Management in Microsoft Outlook
We have just completed our report titled:
8 SIMPLE TIPS FOR E-MAIL MANAGEMENT IN MICROSOFT OUTLOOK
My Inbox has been FLOODED with emails from readers who wanted to get their hands on the report... which ironically is one of the "problems" discussed in it.
This report is the result of many hours of my own research as well as a major contribution from many of you. Thank You!
Download your copy of our special report now:
http://www.standss.com/t/0904/report.asp
Regards
Sanjay
PS: Download and read the report TODAY. We’re planning a Part 2 in the next few days.
http://www.standss.com/t/0904/report.asp
Wednesday, March 25, 2009
Essential(?) Update for Outlook
On February 24th 2009, Microsoft released an update for Microsoft Outlook 2007. General reports indicate that this update is solving a lot of problems for users experiencing instability and speed issues with Outlook 2007.
But… this update is NOT carried out automatically if you are using Windows Updates and it is even not available for download. Instead you need to request the download from Microsoft using a form on their website.
Although I have not tested the update myself (my Outlook has been behaving very well recently), here are the most important links that I could find on this topic.
Microsoft Articles
Request and Download Outlook Update: Use links on this page to request Microsoft for the download link.
Whitepaper: Additional information for Network Administrators.
Articles on the Microsoft Outlook Team Blog
February Cumulative Update Announcement: Initial announcement
Frequently Asked Questions: Top questions, comments and concerns regarding the update
WARNING: Make sure you don't need to use Outlook immediately after installing the update. Your Outlook data files will be converted the first time you open Outlook. This may take a few hours if you have a lot of data.
Did the update work for you?
If you download and install the update, please let us know of its effects by leaving a comment on the blog.
Wednesday, March 11, 2009
Marking Outlook Appointments as Complete
A reader asked me if there was anyway in Outlook to mark appointments as complete... this is available for Tasks so it should be fairly safe to assume that there must be an easy way to do the same for appointments/calendar items. It turns out there is no built-in way to do this but here's a work-around you can use instead.
If you are using Outlook 2007 (scroll down for earlier versions of Outlook)....
The color of appointment items in Outlook 2007 is controlled using categories.
First... let's create a category to mean Complete.
Go to your Calendar.
Right-Click over any existing appointment.
Click Categorize and then click All Categories.
Click the New button.
Enter a name for the category (I used the word Complete), choose a Color and click OK.
Click OK again to return to the Calendar screen.
The appointment you had right-clicked over should now be colored. If this appointment is actually not completed, you can clear the color by...
Right-click over the calendar item.
Click Categorize and click on the Complete category again (or click on Clear All Categories).
To mark another appointment on your calendar as complete.
Right-click over the calendar item.
Click Category and select the category of your choice (the Complete category).
If you are using Outlook 2003 or earlier....
The color of appointment items in Outlook 2003 (or earlier) is controlled with labels. Outlook comes with a default set of 10 labels (each of a different color) and you can also create your own.
First... let's change one of the labels to mean Complete.
Go to the Calendar folder.
On the menu at the top, click Edit-Label
Edit the label text as needed (I have changed my Red label to Complete)
Now... to mark an appointment on your calendar as complete..
Right-click over the calendar item.
Click Label and select the label of your choice.
Easy!
This little technique makes it simple to see which appointments have been completed and which ones still need your attention. You can also use the same technique to color code different types of appointments for quick visual reference.
Did you like this article? Do you have suggestions to improve this technique?... Please leave a comment on the blog.
Related Articles
Color Coded Emails In Your Inbox
Let Outlook Highlight Important Emails
Wednesday, March 4, 2009
QUICK & EASY EMAIL SORTING
Do you have folders with huge lists of emails in them? Here is a quick easy way to find particular emails by sorting your emails anyway you want.
Go to your Inbox (or any other email folder that you wish to sort). Do you see a list of column titles at the top (with labels like From, Subject, Received)

To sort by the Received date, click on the Received column title (as shown above).
You will notice a little arrow next to the Received column title in the screen above. This indicates that the email list is sorted by the Received column.
The arrow pointing downward means that the list is sort in descending order i.e. the newest emails are at the top of the list and the oldest are at the bottom (for other fields it means that it will sort from Z to A).
The arrow pointing upward means that the list is sort in ascending order i.e. the oldest emails are at the top of the list and the newest are at the bottom (for other fields it means that it will sort from A to Z).
To make a list sort by a different column, simply click on the title of the column you wish to sort by.
To change the way a list is sorted (i.e. change from ascending to descending), click on the title of the column again.
In summary… to sort, click on the column title!
If you find this post useful, please leave a comment on the blog.
Other Articles of Interest: